
Raspberry PI IoT using Window 10 Core
When Raspberry PI version 2 came out, it was released with the idea that Microsoft will release a core version of Windows 10 for the PI. Well that day has come. Beginning of May 2015 Microsoft released Windows 10 IoT Core as a free download for Raspberry PI.
Even though it is and RC version and issues are there, the installation was fairly smooth. I will guide you here on how to do that.
Hardware Hardware Hardware
Here are the items lists of what you will need to install Windows 10 Core and run your first application:
Hardware to install windows 10 core
- Raspberry PI 2
- Micro SD Card
- HDMI Cable
- Ethernet Cable
- Raspberry PI Power Supply (You can use phone charges, as long as they are 5V rated)
Hardware to run the first blink demo
- Jumper wires
- 300Ω to 500Ω; resistor
- Breadboard
- LED - any kind you like or color
-
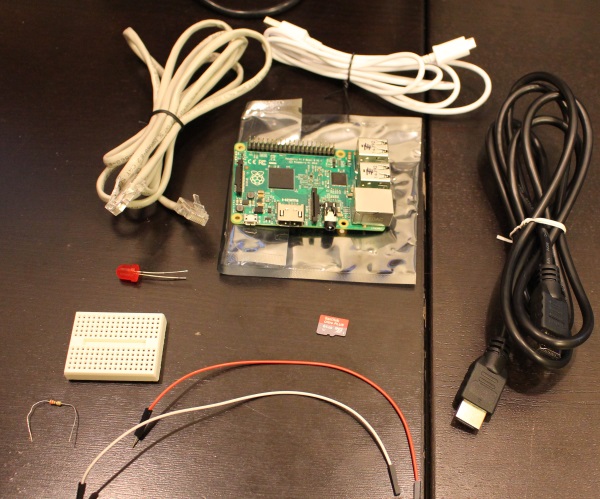
Hardware needed
Software
There is a hand full of software that is needed; however most of them are fairly straight forward. Before you can start downloading the software make sure you register with windows 10 and Microsoft Connect. There will be couple of Terms and User agreement that you will need to click through before you can download the IoT core. I'm assuming that you already did that and signed in as well.
- Windows 10 ADK - Download and install that way we can flush windows 10 to a SD card (download should start automatically)
- Microsoft Connect Download Page
- Windows 10 Insider Preview - Make sure you are downloading the ISO file
- VMware Player
Note: If you have a machine that you don't mind installing windows 10 (because it is the RC version) you can just flash the ISO download and you have no need of VMware or the ADK. My assumption is that you will want to install Windows 10 as a VM.
Installation
-
Install the ADK you downloaded. That will install tools that are the same as if you installed windows 10. This will be useful for us to flush the Windows 10 IoT Core to an SD Card.
When installation is finished you will find under All Programs (Start -> All Programs) a new folder "Windows Kits\Windows ADK". Within that folder you will find Deployment AndImaging Tools. Right click and run as Admin.
Insert your micro SD card to your computer (or the adapter) and from the window you open in the previous paragraph type:
diskpart <enter> list disk <enter> exit <enter>This will list all the available disks you have. Notice the number of the disk that belongs to your SD Card ( we will use it in a minute)
-
Where you downloaded the Raspberry Pi Core file from Microsoft Connect, unzip it and notice the location
-
From the command line navigate to the folder you unzip the Core IoT from the step above. Run the following command: (remember the disk number you got from diskpart, you will need to replace ### in PhysicalDrive### with the disk number from above)
dism.exe /Apply-Image /ImageFile:flash.ffu /ApplyDrive:\\.\PhysicalDrive### /SkipPlatformCheckThis will flash the core IoT to your SD card. When it is down use the safely removed hardware option to eject the SD card
-
Connect the SD card to your Raspberry PI. Also connect the HDMI and Ethernet. Power up your PI. You should see the windows logo showing up. The screen might flash couple of time and the Pi should reboot once. When it comes up you should see a page, with the image of the Pi on the left and your IP address in the Center right. See Image below for example Before you move on note the IP Address of the PI
-
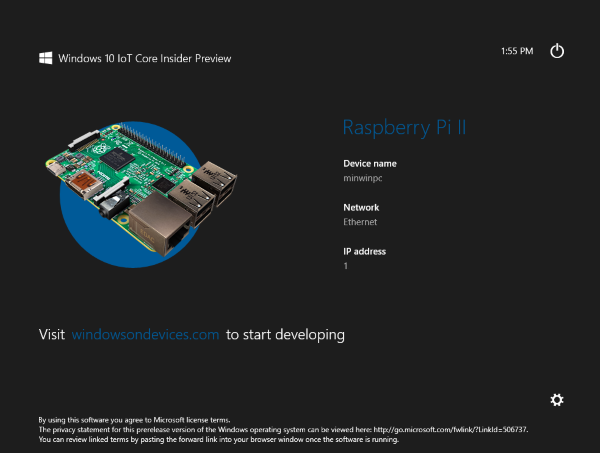
Successful Installation
Congratulation you installed Windows 10 IoT and successfully started Raspberry PI with it
-
OK you might think to yourself... Now what? Well that is a good question and that is also where the VM and the ISO come handy. Now we will need to install windows 10 (the ISO file), Visual Studio 2015 (yes that is also in preview) and WindowsDeveloperProgramForIoT.msi that came with the IoT zip file
-
Install VMWare and follow the direction. Depending on your machine you might want to add more memory and cores (I will leave it up to you)
-
Use the ISO file to install windows 10 on the VM. I will assume that this is not the first time you installed windows.
-
After windows 10 is done installing on the VM, player around make sure you are good and checked out what will be new with windows 10. After you had your fun, copy WindowsDeveloperProgramForIoT.msi from your desktop to the VM and install it there. For me it crashed but i think it was still running in the background. The idea for that msi is that it will be able to identify all components that runs IoT core (like the PI)
-
go to VS 2015 and download the preview version
-
Before we can start working on the sample, we will need to make sure that we can connect to the PI from the VM and mark our VM as trusted machine. To do that we will need to start power shell command as Admins
from the power shell you will want to run the following command (Note: replace ###.###.###.### with the PI IP address you got above
net start WinRM <enter>
Set-Item WSMan:\localhost\Client\TrustedHosts -Value ###.###.###.### <enter>
remove-module psreadline -force <enter>
Enter-PsSession -ComputerName ###.###.###.### -Credential ###.###.###.###\Administrator<enter>
The last command will pop up a login window. The default password is p@ssw0rd (notice that it is a zero not the letter 'O') The connection might take up 30 seconds.
To double check that the remote debugger is turned on run tlist and make sure you see two instances of msvsmon.exe If you do not see msvsmon.exe, the easiest will be to just restart your PI: shutdown /r /t 0
-
Setting Your environment for development that way you can write some code with VS15. To do so run gpedit.msc. Navigate to Local Computer Policy->Administrative Templates->Windows Components->App Package Deployment In there we need to turn on two settings: * Allow all trusted apps to install * Allow development of Windows Store app and installing... (right click-> edit-> enable)
-
Now we ready to start with the demo; go to Blink Example and download the project.
Start visual studio with the project you have selected. We will need to setup remote machine (where the green arrow is). If you click Debug 'Project Name' Property (last option) you will get to the Debug option. In the middle of the page you will see start options. Make sure Target device is set to Remote Machine. Make sure Remote machine is set to the PI IP address. Uncheck (make sure the checkbox is not selected) Use Authentication.
Connect your LED to the breadboard, the resistor to the positive side of the LED. One jumper wire to the ground on the PI (Pin 39 for example) from the negative of the LED and one jumper wire from pin 29 (GPIO 5) to the free end of the resistor
-
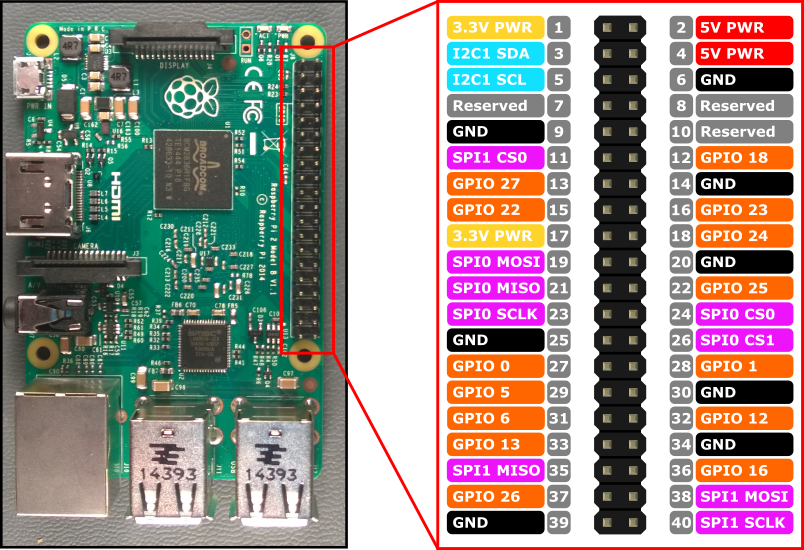
Raspberry PI 2 Pin out
Make sure your monitor is on (the Blink project is a headed application). Click green arrow to start with remote machine. Your code should compile, the LED will blink and you will be able to see that blinking on the screen as well.
Congratulation you just created your first IoT application using Raspberry PI 2
-
That is it... it is very cool and amazing that a breakpoint can be set in VS15 which if you ran the program on debug mode, you will be able to break... that is just awesome